


🎄 Tis the Season to Rustle Up Some Christmas Trees!
Develop a CLI app displaying a Christmas tree in Rust


Table of contents
🎄 Tis the Season to Rustle Up Some Christmas Trees!
Ho ho ho! It's that time of year again, when the jolly old man in red comes down the chimney and the air is filled with the scent of pine and eggnog. And what better way to get into the holiday spirit than by rustling up some festive Christmas trees in Rust? In this tutorial, we'll be using the magical termion crate to handle terminal input and output, and the clever clap crate to parse command line arguments. So grab your hot cocoa, put on your ugly Christmas sweater, and let's get coding!
Step 1: Create a New Rust Project and Add Dependencies 🛠️
First things first, let's create a new Rust project using cargo, the Rust package manager. Open up a terminal and run the following command:
$ cargo new christmas_tree --bin
This creates a new Rust project called christmas_tree with a binary target (a standalone executable).
Next, add the termion and clap crates to your Cargo.toml file by adding the following lines to the dependencies section:
termion = "1.5.5"
clap = "2.33.0"
This adds the termion and clap crates as dependencies to your project.
We also need another crate: rand, to add some randomized color to our project.
So let’s add
rand = "0.7"
under the dependencies section
Step 2: Import thetermion clap and rand crates and their types 🛰
Add the following lines at the top of your src/main.rs file to import the termion, clap and their types:
use termion::{color, style};
use clap::{App, Arg};
The color module provides functions for setting the foreground and background colors of text in the terminal, and the style module provides functions for setting the text style (e.g. bold, italic, underline). The App and Arg macros are provided by the clap crate to define and parse command line arguments.
Step 3: Define the Command Line Arguments 🔮
Use the App and Arg macros provided by the clap crate to define the command line arguments for your program.
For example, you can define a required tree_height argument that takes an integer value like this:
let matches = App::new("my_program")
    .arg(
        Arg::with_name("tree_height")
            .help("The height of the tree")
            .required(true)
            .takes_value(true),
    )
    .get_matches();
The App::new method creates a new App struct with the name of your program. The arg method adds a new argument to the app, and the with_name method sets the name of the argument as "tree_height". The help method sets the help text for the argument, the required method sets the argument as required, and the takes_value method specifies that the argument takes a value.
Finally, the get_matches method parses the command line arguments and returns a Matches struct.
You can also add other optional arguments, such as a --color flag that specifies whether to color the asterisks or not. For example:
let matches = App::new("my_program")
    .arg(
        Arg::with_name("tree_height")
            .help("The height of the tree")
            .required(true)
            .takes_value(true),
    )
    .arg(
        Arg::with_name("color")
            .help("Whether to color the asterisks or not")
            .short("c")
            .long("color")
            .takes_value(false),
    )
    .get_matches();
The short method sets the short version of the flag (e.g. -c), and the long method sets the long version (e.g. --color). The takes_value method specifies that the flag does not take a value.
Step 4: Parse the Command Line Arguments 🧩
Use the get_matches method of the App struct to parse the command line arguments passed to your program.
For example, you can parse the tree_height argument like this:
let tree_height: usize = matches
    .value_of("tree_height")
    .unwrap()
    .parse()
    .unwrap();
This gets the value of the tree_height argument as a string, parses it as a usizeusing the parse method, and returns the result.
Step 5: Print the Top of the Tree 🌟
Add the following code to print the top of the tree:
// Print the top of the tree
  println!("{}{}{}", color::Fg(color::Yellow), " ".repeat(tree_height-1), "*");
This prints a shiny yellow star 🌟 at the top of the tree.
Step 6: Loop Through the Rows of the Tree 🌳
Add the following code to loop through the rows of the tree and print the asterisks:
// Loop through the rows of the tree
for i in 1..tree_height {
    // Select a random color for the asterisks
    let color_index = rand::random::<usize>() % 3;

    // Indent the rows of the tree
    let indent = " ".repeat(tree_height - i - 1);

    match color_index {
        0 => println!("{}{}{}", color::Fg(color::Green), indent, "*".repeat(2 * i + 1)),
        1 => println!("{}{}{}", color::Fg(color::Red), indent, "*".repeat(2 * i + 1)),
        2 => println!("{}{}{}", color::Fg(color::LightBlue), indent, "*".repeat(2 * i + 1)),
        _ => unreachable!(),
    };
}
This loops through the rows of the tree from 1 to tree_height - 1, and prints the asterisks of each row.
The i variable is the index of the current row, starting from 1 ( we already printed the row 0 with the🌟 at the previous step ) . The color_indexvariable is a random number between 0 and 2 that selects a random color for the asterisks.
The indent variable calculates the number of spaces to indent the row based on the height of the tree and the current row. The " ".repeat(tree_height - i - 1) expression repeats the space character tree_height - i - 1 times.
Finally, the println! macro prints the indent and the asterisks of the row, using the repeat method to repeat
Step 7: Put It All Together 🎁
Here is the complete code for the Christmas tree command line application:
use clap::{App, Arg};
use termion::color;

fn main() {
    // Define the command line arguments
    let matches = App::new("my_program")
        .arg(
            Arg::with_name("tree_height")
                .help("The height of the tree")
                .required(true)
                .takes_value(true),
        )
        .arg(
            Arg::with_name("color")
                .help("Whether to color the asterisks or not")
                .short("c")
                .long("color")
                .takes_value(false),
        )
        .get_matches();

    // Parse the tree_height argument
    let tree_height: usize = matches
        .value_of("tree_height")
        .unwrap()
        .parse()
        .unwrap();

    // Print the top of the tree
    println!("{}{}{}", color::Fg(color::Yellow), " ".repeat(tree_height-1), "*");

    // Loop through the rows of the tree
    for i in 1..tree_height {
        // Select a random color for the asterisks
        let color_index = rand::random::<usize>() % 3;

        // Indent the rows of the tree
        let indent = " ".repeat(tree_height - i - 1);

        match color_index {
            0 => println!("{}{}{}", color::Fg(color::Green), indent, "*".repeat(2 * i + 1)),
            1 => println!("{}{}{}", color::Fg(color::Red), indent, "*".repeat(2 * i + 1)),
            2 => println!("{}{}{}", color::Fg(color::LightBlue), indent, "*".repeat(2 * i + 1)),
            _ => unreachable!(),
        };
    }
}
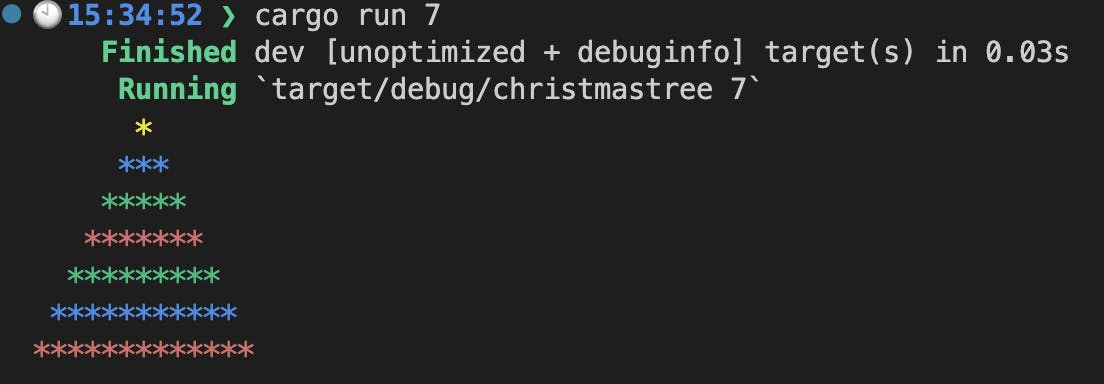
To run the program, you can use the following command:
cargo run 7
All the code 👨💻
If you want to check the complete project head here christmastree
Conclusion 🎉
Well, that's it! You've just rustled up a Christmas tree command line application in Rust. You can now sit back with a mug of eggnog and admire your handiwork, or add your own festive touches to the code. I hope you've had a jolly good time following this tutorial and learned something new. Merry Christmas and Happy Holidays to all, and to all a good night! 🎅🏼🎄